1. Getting started
1.1. Introduction
I want you to understand how Django deployment works, and in order for you to understand it we’ll need to experiment. So you will need an experimental Debian or Ubuntu server. You could create a virtual machine on your personal system, but it will be easier and more instructive if you have a virtual machine on the network. So go to Hetzner, Digital Ocean, or whatever is your favourite provider, and get a virtual server. In the rest of this book I will be using $SERVER_IPv4_ADDRESS to denote the ip address of the server on which your Django project is running; so you must mentally replace $SERVER_IPv4_ADDRESS with “1.2.3.4” or whatever the address of your server is. Likewise with $SERVER_IPv6_ADDRESS, if your server has one.
If you find the above confusing, maybe it’s because you don’t know what this book is about. “Deployment” means installing your Django application on production. This book doesn’t teach you how to develop with Django; you need to already know that. If you don’t, you need to read another book.
If you are really looking to deploy your Django application, and you can
already create a Debian or Ubuntu server, login to it with ssh, use
scp to copy files, use basic commands like ls, and understand
some basic encryption principles, that is, what is a public and private
key, you can probably skip most of this chapter. Otherwise, I’ll take
you step by step, right from getting a virtual server, logging in to it,
and using essential GNU/Linux commands.
1.2. Getting a server
Until recently, I used to create test servers on my laptop using virtualbox and/or vagrant. However, virtual servers on the cloud have become so cheap that it is usually better to hire one there. It’s faster to set up, and you don’t need to worry about NAT. The other time I needed a Ubuntu server for a brief test. I created one on DigitalOcean within a couple of minutes; I made my test; and then I destroyed the server, after about half an hour. DigitalOcean’s charge for that was $0.01. The cool thing about DigitalOcean is that you can get a test server for only as long as you need it, and get charged only for the number of hours for which the server exists. In other providers you usually pay for the whole month.
(Note: I am not affiliated with DigitalOcean, and I am not using their referrals program.)
So, if you don’t already have a cloud VM provider, sign up on https://digitalocean.com and create a droplet. DigitalOcean calls its servers droplets, but they are just virtual machines. In order to create a droplet, you need to choose the operating system and some other things.
If you don’t want to know much about your options for the operating system, just choose Ubuntu 16.04 64 bit.
Tip
Debian or Ubuntu?
These two operating systems are practically the same system. You have probably already chosen one of the two to work with, and there is no reason to reconsider.
If you haven’t chosen yet, and you want to know nothing about this, go ahead and pick up the latest LTS version of Ubuntu, which currently is 16.04 (and will continue to be so until April 2018).
The reason I recommend Ubuntu is mostly that it is more popular and therefore has better support by virtual server providers. Ubuntu’s Long Term Support versions also have five years of support instead of only three for Debian (though recently Debian has started to offer LTS support but it’s kind of unofficial). On the other hand I feel that Ubuntu sometimes rushes a bit too much to get the latest software versions in the operating system release, whereas Debian can be more stable; but this is just a feeling, I have no hard data. I use Debian, but this is a personal preference because sometimes I’m too much of a perfectionist (with deadlines) and I want things my own way.
In Ubuntu’s version numbering, the first number is the year and the second is the month; so 16.04 was released in April 2016. The LTS versions are the ones released in April of even years, so the next LTS version will be 18.04. I don’t see why someone would use the 32-bit version, which can support only up to 4 GB of RAM, so choose the 64-bit version. Don’t choose a non-LTS version; support for these lasts less than a year, and it is too little.
Besides operating system, you also need to choose size, data center, IPv6, SSH keys, and host name.
The size of the server depends on how heavy the application is. For our purpose, which is testing Django deployment, the smallest one is usually more than enough. In fact, 512 MB of RAM and 20 GB of disk space are sometimes enough for small applications in production.
Choose the data center that is nearest to you.
I like my servers to have IPv6, so I always turn that on.
Don’t specify SSH keys yet, unless you are comfortable with them already. I devote the whole next section to SSH keys.
Finally, choose a host name. Usually, when it is for testing, I look
at the time and if it’s 17:02 I name the server test1702. For
production, if I don’t have anything better, I choose names of Greek
rivers at random.
Hit the big green Create button and your server will be ready after one or two minutes. DigitalOcean will create a password for your server and email it to you.
In order to login from Unix (such as Linux or Mac OS X), open a terminal and type this:
ssh root@[server ip address]
The first time you attempt this, it will warn you that the authenticity of the host cannot be established; tell it “yes”, you are sure you want to continue connecting. It will then ask for the password. The first time you connect, it may force you to change the password. Note that when you type a password, nothing at all is shown, no bullets or other placeholders, it’s as if you are typing nothing, but it is actually registering your keystrokes.
You can logout of the server by entering exit at its command prompt.
Ctrl+D also works.
From Windows you first need to install an SSH client. The most
popular one is PuTTY, which you can download from http://putty.org/.
It’s a single file, putty.exe. Each time you execute it, it will
launch its configuration window. Type the server ip address in the “Host
Name (or IP address)” field and click Open.
The first time you attempt this, it will warn you that the authenticity
of the host cannot be established; tell it Yes, you trust the host. It
will then ask for the user name (“login as:”), which is root, and
the password. The first time you connect, the server may force you to
change the password. Note that when you type a password, nothing at all
is shown, no bullets or other placeholders, it’s as if you are typing
nothing, but it is actually registering your keystrokes.
Eventually you will want to copy and paste text from and to PuTTY. Just selecting text automatically copies it to the clipboard, and pasting is just right-clicking.
You can logout of the server by entering exit at its command prompt.
Ctrl+D also works.
1.3. Introduction to SSH keys
You have deadlines. Learning about SSH keys doesn’t seem to be urgent. You can live without them, can’t you? Is it worth to spend an hour to learn about them? The answer is yes. If you log on to a server 12 times per day (a conservative estimate), and it takes on the average 5 seconds to type your password (and retype it if it’s wrong), that’s one minute. You will have paid off your investment in three months. But there are more savings; when creating a droplet on DigitalOcean you will just be ticking a box and you will be ready to login. Otherwise you will be needing to wait for the email to come, copy and paste your password, and go through the process of changing the password. SSH keys can also be used on GitHub and other services. Finally, a little understanding of public key cryptography will later help you setup HTTPS, which is based on the same principles. So let’s start.
You will first create a pair of keys, which we call the public key and the private key. Let’s just do it first. You won’t be understanding what we are doing, but I will explain it afterwards.
On Unix, such as Ubuntu or Mac OS X, just enter the command
ssh-keygen, which stands for ssh key generator. It will ask you a
couple of questions:
- It will ask where to store the keys. Since we are just testing, I suggest to store them in /tmp/id_rsa.
- It will ask for a passphrase. For the time being, do not use a passphrase. We will come to the passphrase later on.
This will create two files; the private key will be in /tmp/id_rsa,
and the public key in /tmp/id_rsa.pub.
On Windows, download PuTTYgen from the PuTTY download page.
Like PuTTY, PuTTYgen is a single .exe file which you
double-click on and it runs. Click on “Generate”. It will ask you to
move the mouse over the blank area; do so. After it finishes, click
“Save private key”. Ignore the warning about having an empty
passphrase, we will deal with that later. Save the private key to a
file named id_rsa.ppk. Leave the PuTTYgen window open, as we will
need to copy the public key shown at the top, in the field “Public key
for pasting into OpenSSH authorized_keys file”.
In order to login to a server, create a droplet in DigitalOcean. In the
droplet creation form, at the “Add your SSH keys” section, click “New
SSH Key”. In the “SSH key content” field, paste the public key. In
Unix, the public key is the contents of the file id_rsa.pub; in
Windows, it is displayed at the top of the PuTTYgen window. When you
create the droplet, it won’t send you any email, as you won’t need a
password. The server will be ready for login with your SSH key.
Here is how to logon to the droplet from Unix:
ssh -i /tmp/id_rsa root@[server_ip_address]
In Windows, start PuTTY, and enter the server’s IP address at the
“Host Name” field (also look at Fig. 1.1). In addition, in
the “Category” tree on the left, go to “Connection”, “Data”, and in
“Auto-login username” enter “root”; then go to “SSH”, “Auth”, and in
“Private key file for authentication” specify the id_rsa.ppk file;
finally, go to “Session”, specify a name in “Saved Sessions”, and click
“Save”. Finally, click “Open”. You should now login on the server
without password.
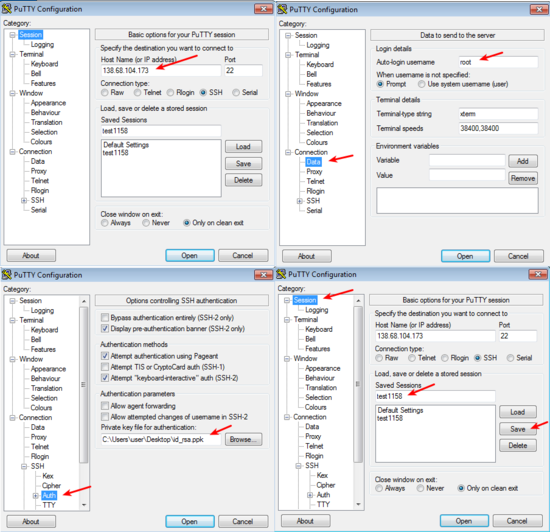
Fig. 1.1 How to configure PuTTY
What’s more, in the future, if you just open PuTTY and double-click on the saved session name, you will immediately logon to the server.
1.4. How SSH keys work
As you noticed, the key generator created a public key and a private
key. These “keys” are just numbers, integers, but large ones; if printed
in decimal, they would be several hundreds of digits long. In order to
save some space, they are stored in the files in a format that is more
condensed than decimal, but the file format does not concern us (in
fact, the private key file contains both keys, so if you lose the public
key file you can generate it from the private key file using ssh-keygen
-y in Unix or clicking “Load” on PuTTYgen).
These numbers are called keys because they are used in encryption and decryption. Encryption systems use keys. For example, a silly encryption system could be to replace a with b, b with c, and so on, so that the word “chair” becomes “dibjs” and the word “zoo” becomes “app”. Or, instead of moving one letter forward you could move two letters forward, so “chair” becomes “ejckt” and “zoo” becomes “bqq”. In both cases, the algorithm is the same, but the key changes—in the first example the key is 1 (we moved one letter forward) and in the second it is 2 (two letters forward). In that algorithm, the key is a number from 1 to 25. If you send me an encrypted message with this algorithm and someone intercepts it, if they know the key with which it was encrypted they can decrypt it. Of course in this dummy system it’s trivial to find the key, and there are only 25 possible keys anyway, but what I want to illustrate here is that you need the key in order to decrypt the message. Serious encryption algorithms like AES are similar to our silly algorithm with respect to the fact that you decrypt with the same key that you used to encrypt, which gives them the name “symmetric”.
Now, asymmetric, or public key cryptography algorithms, such as RSA,
have the property that keys go in pairs, and if you encrypt a message
with one key, you can only decrypt it with the other key of the pair.
What’s more, although there exists a method with which you can generate
pairs of keys, if you know one of the two keys of a pair, you can’t
derive the other. At least that’s what the mathematicians think. So our
generator, ssh-keygen or PuTTYgen, generated a pair of two such
numbers. It christened one of them “public key” and the other “private
key”. So now if you want to send me an encrypted message I can just give
you my public key, and it doesn’t matter if someone intercepts it. You
can encrypt the secret message with my public key and send it to me, and
it doesn’t matter if someone intercepts it. Only I have the
corresponding private key, and only I can decrypt the message.
But how can this be used for authentication? Well, I can take any message, such as “hello world”, and encrypt it with my private key. I can then send it to you. You have my public key. You can decrypt the message. Since you were able to decrypt it with my public key, you know that it was encrypted with my private key. But only I have my private key, so it was I who encrypted the message. So you know I did it and no-one else. This is how digital signatures work, and how ssh authentication works.
So, the server is configured to accept login from you. It knows your
public key. The server asks the ssh client to encrypt some information
with your private key. The ssh client (i.e. ssh on Unix or PuTTY on
Windows) does so, and sends the encrypted information back to the
server. The server verifies it can be decrypted with your public key,
and then it gives you access.
You configure a server to accept SSH keys simply by adding them to
/root/.ssh/authorized_keys, one public key per line. Logon to the
server and examine the contents of the file (nano is the simplest
text editor in GNU/Linux systems):
nano /root/.ssh/authorized_keys
You will see that it contains a line with the SSH key you pasted from
PuTTYgen or from the id_rsa.pub file. That is all the Digital
Ocean UI did, it just added the key to that file. You can specify many
allowed keys in that file, one key per line. /root is the home
directory of the root user, so the keys specified in
/root/.ssh/authorized_keys may logon as root. If the system has a
user named joe, the home directory of joe is usually /home/joe, and
the keys allowed to logon as joe will be stored in
/home/joe/.ssh/authorized_keys.
It’s not only people who have SSH keys; SSH servers also have their own
keys. Your server has key pairs in /etc/ssh. It’s not only you who
needs to authenticate with the server, but the server also needs to
authenticate with you. You really need to know that you are logging in
to your own server; an attacker could have compromised your local DNS
cache and be directing you towards another server. They could steal
valuable information if they did that, or obtain access to the real
server. This is why, the first time you connect to a server, your SSH
client gives you a warning. The server has provided its public key and
has proven that it has the corresponding private key, but the SSH client
has never connected to this server before, so it has no way of verifying
that that server is really that server. The next times you connect to
that server there will be no warning, because the SSH client can now
verify that it is the same server as the server it connected to the
previous time. On Unix, the ssh client stores server keys in
$HOME/.ssh/known_hosts; PuTTY stores them in the registry, in
HKEY_CURRENT_USER\Software\SimonTatham\PuTTY\SshHostKeys.
You may have noticed that the warning mentions the “fingerprint” of the key of the server. It could have just given us the public key, but this would have been inconvenient because keys are so large. Therefore to identify keys we use hashes of the keys which we call fingerprints and are much smaller; they are usually numbers with 32 hexadecimal digits. While it cannot be ruled out that two different keys might have the same fingerprint, the probability of this happening is lower than the sky falling on your head in the next minute, so it’s not something you should worry about.
1.5. Using an SSH agent
Usually you only need a single pair of keys. On Unix, we usually
store them at $HOME/.ssh/id_rsa and $HOME/.ssh/id_rsa.pub.
ssh-keygen by default places them there, and the ssh client, “ssh”,
uses them without needing to specify any parameter. On Windows there
is no prescribed location, so you should put your .ppk file wherever
it is convenient.
Now, whoever has your private key can probably format all your servers,
and possibly delete all your software on GitHub. If your laptop is
stolen, they get your key (unless your disk is encrypted). It doesn’t
matter if they don’t know your boot password or your login password.
Anyone with a screwdriver can reset your BIOS password, and there are
several ways to access a disk when you don’t know the login password;
one of the most obvious is to plug the disk on another system. For this
reason, you should encrypt your private key file with a passphrase. You
can either create a new key and not give it an empty passphrase, or you
can change the passphrase of an existing key. You do this with
ssh-keygen -p -f /tmp/id_rsa (you can omit the -f /tmp/id_rsa
part if you want to use the default file, $HOME/.ssh/id_rsa), or by
loading the key in PuTTYgen, specifying a passphrase, and saving it
again.
But it doesn’t make any sense to key in the passphrase each time you want to login to the server. There would be little advantage over typing the password each time. So what we do is run an “agent”, software that runs continuously in the background, and keeps our unencrypted private key cached in memory. The ssh client communicates with the agent whenever needed and gets the key from there. The agent only asks for the passphrase once after you login to your local machine, and then keeps it cached until logout or shutdown. This, combined with a screen saver that locks your screen after a few minutes of inactivity (I use 5 minutes), is reasonably secure.
On GNU/Linux, you don’t need to do anything. ssh-agent, as the
agent is called, is installed by default. The first time you attempt to
ssh into the remote server, it will ask you for your passphrase.
On Windows, you need to download pageant.exe from the PuTTY
download page and set it up to start at login. On Windows 7, you go to
Start, All programs, Startup folder, right-click on the folder and
select “Open”, and in there create a new shortcut which should execute
C:\...\pageant.exe C:\...\your_key.ppk. After you do that, try to
logout and login (or restart the system altogether), and as soon as you
login pageant will start and ask you for your passphrase.
Finally, on Mac OS X, I don’t know how it works, but if you search the web for “Mac OS X ssh-agent” you should find enough information.
1.6. Essential GNU/Linux commands
Right after you login, enter this command:
pwd
This prints the working directory (also called the current directory),
which right after login is /root, which is equivalent, very roughly,
to C:\Users\administrator in Windows (which in older Windows
versions was C:\Documents¬and¬Settings\administrator). /root is
called the “home directory” of the root user. Most other users will have
home directories under /home; for example, if there is user named
joe, the home directory will usually be /home/joe; the root user is
an exception.
In Unix-like operating systems, there is nothing like the drive letters
of Windows. I just plugged a USB storage device on my Debian laptop, and
I can see its files under /media/anthony/ANTONIS. Different storage
devices are thus “mounted” in different locations of the single
directory tree.
Now let’s try to view the contents of the directory:
ls
“ls” stands for “list” and is the equivalent of the Windows dir
command. If it didn’t show anything, it’s because the directory is
empty. If you type ls on its own, it shows the contents of the current
directory. Try listing the root directory instead:
ls /
You can make it list details by adding the -l parameter:
ls -l /
In that case, the output is like Fig. 1.2.
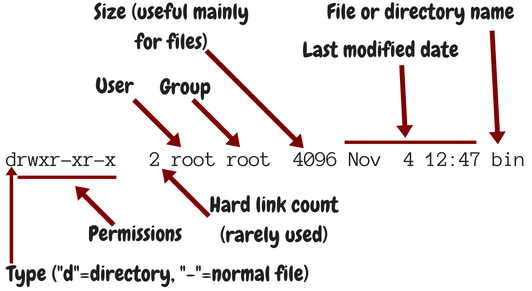
Fig. 1.2 Output of ls
Usually when we use -l we also use -h, which shows prettier
numbers; for example, instead of 4096 it shows 4.0K. You can type either
ls -l -h, or, as is more common, ls -lh.
Just as in Windows, you can change directory using the cd command:
cd /
pwd
In contrast to Windows, cd on its own takes you to the home
directory, so for the root user, a mere cd is equivalent to cd
/root. The Unix-like equivalent of a mere cd in Windows is the
pwd command.
Just a while ago, we tried ls on the /root directory. We are
interested in some files that happen to be hidden. In Unix, when a file
begins with a dot, it’s “hidden”. This means that ls doesn’t
normally show it, and that when you use wildcards such as * to denote
all files, the shell will not include it. Otherwise it’s not different
from non-hidden files. To list the contents of a directory including
hidden files, use the -a option:
ls -a
This will include . and .., which denote the directory itself
and the parent directory (/root/. is the same as /root;
/root/.. is the same as /). You can use -A instead of -a
to list all hidden files except . and ...
The last command we will examine in this section is shutdown. To
restart a machine, enter shutdown -r now. You can also shut down a
system with shutdown -h now, but this much is less often used on
servers.
1.7. Shell files, editing files, remote copying
After the ssh server authenticates you and decides to give you access,
it runs your shell. The shell is the program that accepts input from
you, parses it, and executes the commands you type. There is a number of
shells you can choose from, but most probably you are using the most
popular, which is called “bash”. Bash stores the commands you type in
.bash_history; when at the shell prompt you use the arrow up/down
keys to move through your history of commands, bash gets this history
from the file.
When you login, bash executes the commands in .profile; and when you
logout, it executes the commands in .bash_logout. Finally, each time
an interactive shell starts, it executes the commands in .bashrc.
The difference between .bashrc and .profile is that the latter
is executed only by a “login shell”; that is, by the shell started by
the ssh server as soon as you login; but if you start another shell,
e.g. by entering bash, only .bashrc is executed. Type this:
bash
exit
The first command starts another bash that runs inside the bash you were
running before. The second command exits from the nested bash and
returns you to the previous bash. Of course you would normally not do
something like this, but it demonstrates that the “outside” shell is
probably your login shell, whereas the “inside” shell is another
interactive shell. When the nested one starts, it executes .bashrc.
Now, let’s edit .bashrc.
nano .bashrc
We have already seen nano before—it’s the simplest editor in
GNU/Linux systems like Debian and Ubuntu. Many people prefer to use
vim or emacs, which are very powerful but need some learning.
nano is as simple as Windows Notepad, but it does not need a GUI. At
the bottom it shows you what the special keys do; for example, ^X
(Ctrl+X) exits the editor.
I like the bash prompt to be colored. To use the same colors I use, add this snippet at the end of the .bashrc file:
red=$(tput setaf 1)
green=$(tput setaf 2)
blue=$(tput setaf 4)
reset=$(tput sgr0)
PS1='\[$red\]\u\[$reset\]@\[$green\]\h\[$reset\]:\[$blue\]\W\[$reset\]\$ '
Now exit nano by saving the file, logout and login again, and the
prompt should be colored. I’m not going to explain how these commands
work, as they are quite complicated; my main purpose here was for you to
get a grip with editing a file and see the results.
If you have custom stuff in your .bashrc, you won’t want to login to
the server, edit .bashrc, make the changes, save, logout, and login
again, and all that each time you create a new virtual server. Instead,
you will want to keep your custom .bashrc somewhere in your local
machine and copy it to the new virtual server. If your local machine
runs GNU/Linux, you can use the scp command:
scp .bashrc root@1.2.3.4:/root/
If you have Windows, download pscp.exe from the PuTTY download page,
make sure it’s in the system path, and run it from a command prompt or
PowerShell like this:
pscp .bashrc root@1.2.3.4:/root/
The command means “open an ssh connection to machine 1.2.3.4, login as
root, and using the ssh connection transfer the file .bashrc from
the local machine to the remote, and put it in /root/”. It uses the
ssh keys stored in .ssh or in PuTTY, so it can login without a
password. Instead of .bashrc you could have used a full or relative
path such as /home/anthony/.bashrc or C:\Users\user\.bashrc.
Instead of root@1.2.3.4:/root/ you could have simply used
root@1.2.3.4: (don’t forget the colon at the end); if you don’t
specify a destination, the remote user’s home directory is the default.
Copying also works the other way round; scp root@1.2.3.4:.bashrc .
would fetch the remote file /root/.bashrc locally and put it in the
current directory.
1.8. Installing software on a Debian/Ubuntu server
If you want to install nginx or any other software on Windows, you need to go to the software’s web site, download it, and execute the downloaded installer. In Debian and Ubuntu we rarely do something like this. To install nginx, just enter this command:
apt install nginx
apt is the Advanced Package Tool. Except for “install” it also has
“remove”, with which you can uninstall, and some other options. You will
find out that people mostly use apt-get instead of apt, which is
also correct. apt actually uses apt-get behind the scenes.
What actually happens is that the Debian/Ubuntu developers have packaged
nginx so that it can be installed with apt. They have done this with
thousands of software items, so whenever you want to install something
on your server, chances are it’s packaged. This is true for other
GNU/Linux systems as well, though they usually use different package
managers. CentOS uses rpm, for example.
apt keeps a list of available packages. This needs to be updated
regularly, because it changes whenever there are security updates. Try
this to update the list:
apt update
After you update the list, you also need to upgrade any installed packages:
apt upgrade
After creating a new server, pretty much the first thing you should do is to update the list and upgrade the software. The two commands can be joined into a single one like this:
apt
update && apt -y upgrade
This idiom means “run apt update, and if it succeeds, run apt -y
upgrade”. The -y option tells apt to not ask you “Do you want to
continue?”, but instead assume yes.
In contrast to Windows, which installs updates automatically,
Debian/Ubuntu servers don’t, unless you install package
unattended-upgrades. However, I don’t recommend it. I think it’s a
bad idea to run unattended upgrades, and I’ve once seen a server stop
working when it was performing unattended upgrades and the upgrade
procedure needed to ask a question. We found out the next morning. What
I do is that I am subscribed to the Debian Security Announce mailing
list, so whenever there’s a problem I get notified and I run apt
update && apt -y upgrade. I’m using Debian on all my servers; if you
use Ubuntu, you should subscribe to the Ubuntu Security Announce list
instead.
This applies only to software installed with apt. If you install
software in any other way, apt will not upgrade it, and the
Debian/Ubuntu security announce mailing lists will not mention it. The
most common other way that you will use to install software is pip.
You will probably install Django with pip, and you should be
monitoring the Django blog for security announcements (you can
subscribe to its feed, for example).
Sometimes you will not know how a package is named. Suppose you want to install Apache. You immediately suspect that Apache may be packaged, but you don’t know the name of the package. Here is how to search for Apache:
apt-cache search apache
(apt search apache also works, but apt-cache search is faster
and I like better the formatting of the results.) On a Ubuntu 16.04
system, this returns about 735 results. If you only want to search for
packages that have “apache” in their name (and not just in their
description or elsewhere), you can do this:
apt-cache search --names-only apache
This returns 161. Still many. You can narrow it down by searching only for packages whose name begins with “apache”:
apt-cache search --names-only ^apache
This returns only 12 packages. The first one, apache2, is probably
what you want. You can examine the contents of the package thus:
apt show apache2
There are more ways to narrow down the search, as there are tens of thousands of packages, but I think that’s enough for now.
1.9. Reading the documentation
In the preceding sections, we saw that ls can accept several
options, such as -l, -h, -a, -A, and others, and that
apt-cache search accepts the --names-only option. Where can you
find a reference of the options used?
The answer depends on the tool. Traditionally we use the man command
for this; for example,
man apt-cache
will show you the full documentation of apt-cache.
In 1990 we were still reading the documentation from printed manuals,
and man ls would show you the contents of the printed manual’s
ls entry. “man” stands for manual. At that time, that system was
quite cool. If you wanted to take a quick glance at a detail in the
manual you’d use the man command which was quicker, but if you
wanted to study the manual more carefully you’d prefer to use the
printed version which was easier to read. Remember, there was no web at
that time, and terminals weren’t as smart as they are today (there was
no bold or italics when you used the man command).
When the GNU system was developed at around that time, its developers
thought that the man system was outdated, and they developed
info. Although this is a better system that uses hyperlinks, it
didn’t get much traction, so today it’s not much used. You can access
the full documentation for ls with info ls, but this works much
better from within the emacs editor than with the standalone info
program, and it takes some learning. I never use info; I usually
just use man ls, which is a summary that has most of the information
I need, and if I need more I usually search the web.
Finally, it has lately become fashionable for commands to show help when
given the --help option. Usually the help provided with --help
is more condensed than that provided by man or info. ls has
all three; info, man, and --help.
The quality of the documentation varies. While sometimes the help
provided by man is excellent and can be used as tutorial as well as
reference, very often it is better to familiarize yourself with a
program by reading a book or a tutorial on the web. For example, you
can’t possibly learn git from its official documentation (and you
can barely use it as reference).
1.10. Setting up the system locale
The “locale” is the regional settings, among which the character encoding used. If the character encoding isn’t correctly set to UTF-8, sooner or later you will run into problems. So checking the system locale is pretty much the first thing you should do on a new server.
The procedure is this:
- Open the file
/etc/locale.genin an editor and make sure the line that begins with “en_US.UTF-8” is uncommented. - Enter the command
locale-gen; this will (re)generate the locales. - Open the file
/etc/default/localein an editor, and make sure it contains the lineLANG=en_US.UTF-8. Changes in this file require logout and login to take effect.
Let me now explain what all this is about. The locale consists of a language, a country, and a character encoding; “en_US.UTF-8” means English, United States, UTF-8. This tells programs to show messages in American English; to format items such as dates in the way it’s done in the United States; and to use encoding UTF-8.
Different users can be using different locales. If you have a desktop
computer used by you and your spouse, one could be using English and the
other French. Each user does this by setting the LANG environment
variable to the desired locale; if not, the default system locale is
used for that user. For servers this feature is less important. While
your Django application may display the user interface in different
languages (and format dates and numbers in different ways), this is done
by Django itself using Django’s internationalization and localization
machinery and has nothing to do with what we are discussing here, which
affects mostly the programs you type in the command line, such as
ls. Because for servers the feature of users specifying their
preferred locale isn’t so important, we usually merely use the default
system locale, which is specified in the file /etc/default/locale.
You can understand English, otherwise you wouldn’t be reading this book,
so “en_US.UTF-8” is fine. If you prefer to use another country, such as
“en_UK.UTF-8”, it’s also fine, but it’s no big deal, as I will explain
later on.
Although the system can support a large number of locales, many of these
are turned off in order to save a little disk space. You turn them on by
adding or uncommenting them in file /etc/locale.gen. When you
execute the program locale-gen, it reads /etc/locale.gen and
determines which locales are activated, and it compiles these locales
from their source files, which are relatively small, to some binary
files that are those actually used by the various programs. We say that
the locales are “generated”. If you activate all locales the binary
files will be a little bit over 100 M, so the saving is not that big (it
was important 15 years ago); however they will take quite some time to
generate. Usually we only activate a few.
To check that everything is right, do this:
- Enter the command
locale; everything (except, possibly,LANGUAGEandLC_ALL) should have the value “en_US.UTF-8”. - Enter the command
perl -e ''; it should do nothing and give no message.
The locale command merely lists the active locale parameters.
LC_CTYPE, LC_NUMERIC etc. are called “locale categories”, and
usually they are all set to the same value. In some edge cases they
might be set to different values; for example, on my laptop I use
“en_US.UTF-8”, but especially for LC_TIME I use “en_DK.UTF-8”, which
causes Thunderbird to display dates in ISO 8601. This is not our concern
here and it rarely is on a server. So we don’t set any of these
variables, and they all get their value from LANG, which is set by
/etc/default/locale.
However, sometimes you might make an error; you might specify a locale
in /etc/default/locale, but you might forget to generate it. In that
case, the locale command will indicate that the locale is active,
but it will not show that anything is wrong. This is the reason I run
perl -e ''. Perl is a programming language, like Python. The
command perl -e '', does nothing; it tells Perl to execute an empty
program; same thing as python -c ''. However, if there is anything
wrong with the locale, Perl throws a big warning message; so perl -e
'' is my favourite way of verifying that my locale works. Try, for
example, LANG=el_GR.UTF-8 perl -e '' to see the warning message. So
locale shows you which is the active locale, and perl -e '', if
silent, indicates that the active locale has been generated and is
valid.
I told you a short while ago that the country doesn’t matter much for servers. Neither does the language. What matters is the encoding. You want to be able to manipulate all characters of all languages. Even if all your customers are English speaking, there may eventually be some remark about a Chinese character in a description field. Even if you are certain there won’t, it doesn’t make any sense to constrain yourself to an encoding that can represent only a subset of characters when it’s equally easy to use UTF-8. So you need to make sure you use UTF-8. In the chapter about PostgreSQL we will see that installing PostgreSQL is a process particularly sensitive to the system locale settings.
The programs you run at the command line will be producing output in your chosen encoding. Your terminal reads the bytes produced by these programs and must be able to decode them properly, so it must know how they are encoded. In other words, you must set your terminal to UTF-8 as well. Most terminals, including PuTTY and gnome-terminal, are by default set to UTF-8, but you can change that in their preferences.
1.11. Quickly starting Django on a server
As I said in the beginning, we will be experimenting. Experimenting means we will be trying things. We will be installing your Django project and do things with it, and then we will be deleting it and reinstalling it to try things differently as we move on. You must have mastered setting up a development server from scratch. You should be able to setup your Django project on a newly installed machine within a couple of minutes at most, with a sequence of commands similar to the following:
apt install git python3 virtualenvwrapper
git clone $DJANGO_PROJECT_REPOSITORY
cd $DJANGO_PROJECT
mkvirtualenv --system-site-packages $DJANGO_PROJECT
pip install -r requirements.txt
python3 manage.py migrate
python3 manage.py runserver
It doesn’t matter if you use Python 2 instead of 3, or mercurial (or
even, horrors, FTP) instead of git, or plain virtualenv instead
of virtualenvwrapper, or if you don’t use --system-site-packages.
What is important is that you have a grip on a sequence of commands
similar to the above and get your development server running in one
minute. We will be using virtualenv heavily; if you aren’t
comfortable with virtualenv, read my blog post on virtualenv.
So, you have your virtual server, and you have a sequence of commands
that can install a Django development server for your project. Go ahead
and do so on the virtual server. Do it as the root user, in the
/root directory.
Now, make sure you have this in your settings:
DEBUG = True
ALLOWED_HOSTS = ['$SERVER_IPv4_ADDRESS']
Then, instead of running the development server with
./manage.py runserver run it as follows:
./manage.py runserver 0.0.0.0:8000
After it starts, go to your web browser and tell it to go to http://$SERVER_IPv4_ADDRESS:8000/. You should see your Django project in action.
Usually you run the Django development server with ./manage.py
runserver, which is short for ./manage.py runserver 8000. This
tells the Django development server to listen for connections on port
8000. However, if you just specify “8000”, it only listens for local
connections; a web browser running on the server machine itself will be
able to access the Django development server at
“http://localhost:8000/”, but remote connections, from another machine,
won’t work. We use “0.0.0.0:8000” instead, which asks the Django
development server to listen for remote network connections. Even
better, if your virtual server has IPv6 enabled, you can use this:
./manage.py runserver [::]:8000
This will cause Django to listen for remote connections on port 8000, both for IPv4 and IPv6.
Next problem is that you can’t possibly ask your users to use http://$SERVER_IPv4_ADDRESS:8000/. You have to use a domain name, and, you have to get rid of the ”:8000” part. Let’s deal with the ”:8000” first. “http://$SERVER_IPv4_ADDRESS/” is actually a synonym for “http://$SERVER_IPv4_ADDRESS:80/”, so we need to tell Django to listen on port 80 instead of 8000. This may or may not work:
./manage.py runserver 0.0.0.0:80
Port 80 is privileged. This means that normal users aren’t allowed to listen for connections on port 80; only the root user is. So if you run the above command as as a normal user, Django will probably tell you that you don’t have permission to access that port. If you run the above command as root, it should work. If it tells you that the port is already in use, it probably means that a web server such as Apache or nginx is already running on the machine. Shut it down:
service apache2 stop
service nginx stop
When you finally get ./manage.py runserver 0.0.0.0:80 running, you
should, at last, be able to go to your web browser and reach your Django
project via http://$SERVER_IPv4_ADDRESS/. Congratulations!
1.12. Things we need to fix
Now, of course, this is the wrong way to do it. It’s wrong for the following reasons:
- The URL http://$SERVER_IPv4_ADDRESS/ is ugly; you need to use a domain name.
- You have put your project in
/root. - You are running Django as root.
- You have Django serve your static files, and you have DEBUG=True.
- You are using
runserver, which is seriously suboptimal and only meant for development. - You are using SQLite.
Let’s go fix them.